A different accessory for a hen’s night! 

This month one of my good friends celebrated her upcoming wedding at a hen’s night! You know how hen’s nights often feature brides wearing a cheap, pink sash made out of the cheapest satin the world has ever seen (if not plastic)? Not this one!

The hen’s night consisted of a Spanish cooking class in East Perth with much drinking and subsequent feasting, so the bride was much more in need of an apron than a sash!

Aprons can be a quick and easy make, and this one was no different! No pattern, I just “winged it”, shape-wise. The fabric is a a gorgeous Japanese cotton drill from spotlight. It has braid attached for the tie, and the neck strap.

On the front of the apron I decided to sew a clear plastic panel because I didn’t want it to be single use and put permanently away in a draw due to the “I’m the bride!” or equivalent statement front and centre of the item. As an added bonus, this way it meant I could also make a couple of extra joke labels for the front of the apron, like below!

Ooops! I just noticed that I hadn’t sewn the bottom seam up (or neck strap on) by the time I took this photo.

And here’s a photo of bride in hen’s night action to close!

Screen Shot 2015-03-01 at 12.35.25 pm

Bird (quilt) block

For a friend’s birthday, I wanted to make her a gift… and well, I turned it into a learning opportunity too! I wanted to turn a picture of her pet bird (below) into a quilt block…

I started by making a simple line drawing. I drew long, simple lines as often as possible, to create a bunch of geometric shapes.

Once happy with my design I took a pair of scissors and cut it into shapes and marked up the colours needed!

Here’s what I ended up with, once I’d cut and sewed it up!

This block ultimately became a pot holder, but I didn’t take any photos of the final product before giving it to my friend. Ah, well… 🙂

A story of many triangles, and so many design options!

So, this story goes: I wanted to make a quilt as a gift for a friend. For no reason other than interest (and the fact that I’d never done it before), I decided I wanted to make this quilt using equilateral triangles. So, I went to Spotlight, and messed around with colour combinations on a couple of chairs near the pattern catalogues!

In the end I think i chose 12, maybe 14 (suffragette) colours? Then I went home and started cutting! Lots, and lots, and lots of equilateral triangles!

Then I went and started laying them out. I had no plan for how I wanted it to look in the end, but with (a fixed number of) triangles, I knew I had options. A couple of hours, and much fun!

I started with completely random placement:

Then zig-zags:

Then went to straight lines:

Then went to… a snake!

Then a swirl!

And a rose(?). This design. This design I almost went with. I just liked it!

But this is ultimately what I went with – graduated colours, dark in the bottom left, to light in the top right. All sewn up!

I, obviously, never remembered to take a photo of the completely finished quilt #headdesk…. but, will update the post if/when I get one!

A babby quilt… in corporate colours.

So maybe one day I’ll have to admit, I actually quite enjoy making little quilts for friends having babies!

This is one I made for a work colleague before she went on maternity leave! As usually happens when a colleagues leave, a collection was undertaken to buy them a gift. But this time, rather than a random voucher (or similar) being purchased for the person, I instead suggested that I be given cash to cover the costs of making a quilt as a gift!

Obviously, I wasn’t compensated in any way for the time it takes to sew the quilt – but at least all the material costs (predominately fabrics and batting) are pretty well covered.

I think I like these quilts as gifts because they always feel like a gift that a baby (or their parents) can use for years. I always make them large enough that they can be used both for “tummy time” or playmat when the kid is a baby, but also as a lap quilt for their parents (or when the kid is grown up)! I also never make them out of baby-like pastels – instead I tend towards bold modern colours.

The colours for this quilt were chosen to match my organisation’s corporate colours which… I’ll be honest, are pretty awful! Officially, the primary corporate colour of my organisation is maroon, and not just any maroon… but the ugliest damn shade of maroon you have ever seen. In the end, and after much um-ing and ah-ing over the fabric options out at Sewing World in Maddington. I opted for the following (slightly prettier) maroon/purple/pink/red option instead. 

The flannel backing fabric I used on this quilt is my favourite quilt backing fabric ever. EVER. It’s modern and cute, has DEER…. and, of course, I’ll probably never be able to find it at Spotlight ever again. I backed 2 quilts with this fabric. *sigh*

I can confirm that the quilt was appreciated by its recipient (or at least, his mother ;)).

Help! Opinions sought!

sarahs_avatarSo, this is the first of the 3 dresses I need to sew before November. Points for productivity, Sarah! Problem is, I am not loving this fabric on me at all. The fabric came out of my stash. It is pretty. It is also very, VERY floral. I thought I would like it… but I’m not loving it as much as I hoped/expected!

I’m not sure if it’s the white base (my skin is pasty white as it is), the mustard and green (colours I never wear), or the general tone of the colours (I tend to select jewel tones as they are more flattering on me).

So, I’m contemplating my options… feeling completely undecided, so I want to know what you think!

Should I grab some RIT dye and just dye the whole thing a different colour? With blues, pinks, mustards and greens in the mix, I’d have to pick a colour which wouldn’t over-lay too terribly over each of those colours. I’m wondering whether a blue might work (though blue isn’t one of my favourit-est colours), or maybe a grey? Grey will totally change the dress… but I might wear it more than once (EVER) that way. Hrmm…

What do you think I should do?

photo(1)

Thanks in advance for your opinions!


New doona from the SWA!

sarahs_avatarSWA – Sewing Weekend Away!

One of the projects I sewed at the May 2013 SWA was a new doona for my bed. First, I must say… I do not recommend sewing bedding. The lines of stitching are long and boring, and having to move approximately 10 metres of fabric every time you need to iron/turn a corner is tiring. #bleurgh

But… OMG I’M SO THRILLED WITH THE RESULT! I put this on my bed, and I swear to God – all I wanted to do was jump straight underneath it! Amazingly toasty looking and feeling :))

20130519-200323.jpg

In case you were wondering, this is the doona/duvet which I fell in love with years ago… and was my inspiration to use this.

I originally bought this fabric on sale at Spotlight for about $5/m. Cheap, pretty fabric!

It’s summer in Australia. Shorts required.

sarahs_avatarIt’s Hottest 100 Day/Survival Day/Australia Day here in Australia today… so what could be more appropriate than a post about a pair of SHORTS?!

Shorts. What horrible things to buy in the shops. I don’t know about you, but when I’ve looked for a pair in the shops, they are invariably too tight/short/unflattering Seriously. I’ve never found a decent pair (sport shorts are the only exception to this rule)!

So, this is the third time I’ve made a pair of denim shorts. (I made 2 pairs late last summer and LIVED in them when I was travelling in Cambodia!) The shorts are based the culottes pattern which my previously-posted-about linen trousers were based on too! (Who would’ve thought a somewhat-weird looking pair of culottes would get so much use!?)

Here’s what the finished, super-comfortable, super-weather appropriate product looks like ::

DSC04156

The width of the legs of these shorts are perfect for me – the wider shape is much more flattering than a narrow pair! Here they are from the back ::DSC04157

Good fit, eh? The shorts have a fly front, and waist band. The “button” used is a proper jeans button (I bought a packed of them in Cambodia last year!) – there’s no thread holding it on… you actually have a metal/rubber screw -like thing which I had to bang in with a hammer to attach it. Not sure if that was how I was meant to do it… but it worked, and seems solid! Oh, but my machine ABSOLUTELY HATED sewing that buttonhole!

DSC04164Why, yes. I am an innie! 😀 I don’t find fly-fronts too difficult to sew, following the instructions always seems to get me there! However, at some point I’ll have t figure out how to sew a zip-protector thingy (you know the piece of fabric placed behind the zipper so it doesn’t touch your skin?). These shorts don’t need one… but I’d just be curious to find out how you add one in!

Hmmm… what else? Oh! This ::

DSC04165Polka-dotted quilting cotton for the (hidden) pocket lining? Abso-fruit-ly! I find I get so much more joy out of an item if it has fun hidden things like this!

The denim for these shorts was purchased from Homecraft Textiles in St James. It was tough to find the right denim for these shorts – it couldn’t be too heavy, but it couldn’t be too light either. I eventually found this denim which is just the right weight… though, truth-be-told, is a little more blue than I would’ve preferred. The compromise was totally worth it, though. 🙂


Frankensale dress!

sarahs_avatarSo. As most of you know, local fabric store Potter Textiles recently had a big (50% off) sale. As many of you also know, my office is 138 steps from Potters. So, yeah. No “I will only sew from my stash” new year resolutions for me… the fabric was on sale! 😀

In the sale, I impulse purchased a patterned viscose. I *must* have seen this fabric on the racks many times before… but it had clearly never grabbed my attention. But this time – I could picture exactly the dress I was going to make!

The dress is based on the Sewaholic Cambie pattern which I had made once before… which, come to think of it, I don’t think I’ve ever blogged about! Whoops. Here’s what I ended up with ::

DSC04132

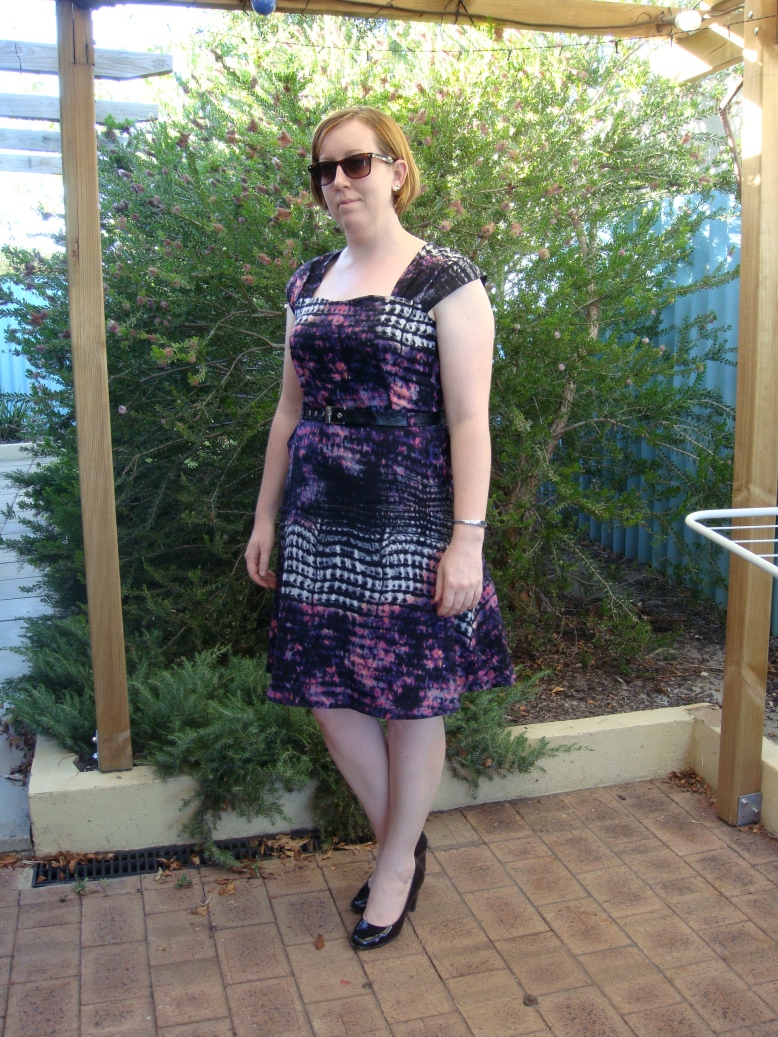
I opted to make the sweetheart neckline less pronounced  (though in hindsight I wish I’d straightened it). But otherwise, I made the bodice pretty much to the pattern (with a few small fitting adjustments).

Here’s the dress from the back (I also wish I’d lifted the back neckline – next time, Gadget! ::DSC04129
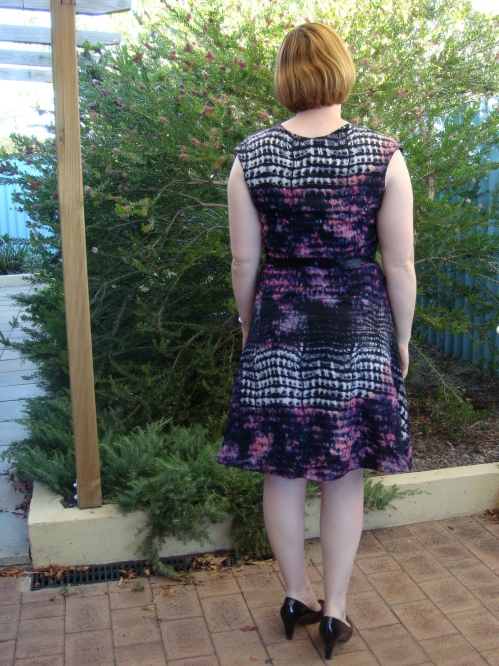
When I made the pattern the first time, I made it with a full skirt. This time, I was making a work dress, so wanted a  a narrower skirt. Having borrowed the pattern from a friend, I didn’t have the pattern pieces for the a-line skirt option which came with the pattern. So I franken-pieced the skirt together using a pattern piece I’d made for an earlier skirt, and then used the pocket pieces/yoke etc from a pair of shorts I’d made! 😛

Here’s how the pockets ended up looking ::

DSC04151

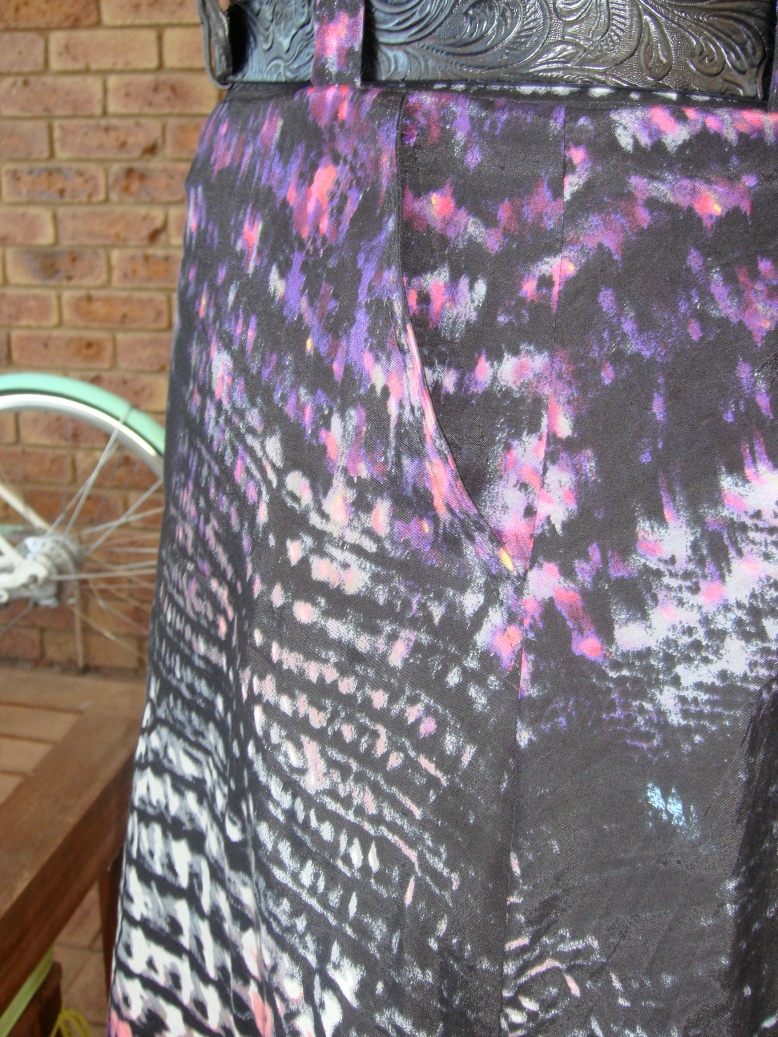
Dresses with pockets are the bestest! I also added belt loops to a dress for the first time. Ace! Also – did you notice my pattern matching on the side seam there? (Sure it’s not like matching stripes or anything… but I made an effort! It counts!)

Want to know the other secret of the dress? Well, I might have had trouble distinguishing the right side of the fabric from the wrong side when I first started sewing. So I might have sewn the darts in backwards. Unfortunately the needle marked the fabric quite badly, sew I decided against unpicking the darts, and instead decided to justify them as a “feature”! 😉 Sneaky, eh? Turns out the busy-ness of the fabric means the outward facing darts aren’t all that obvious anyway!DSC04135

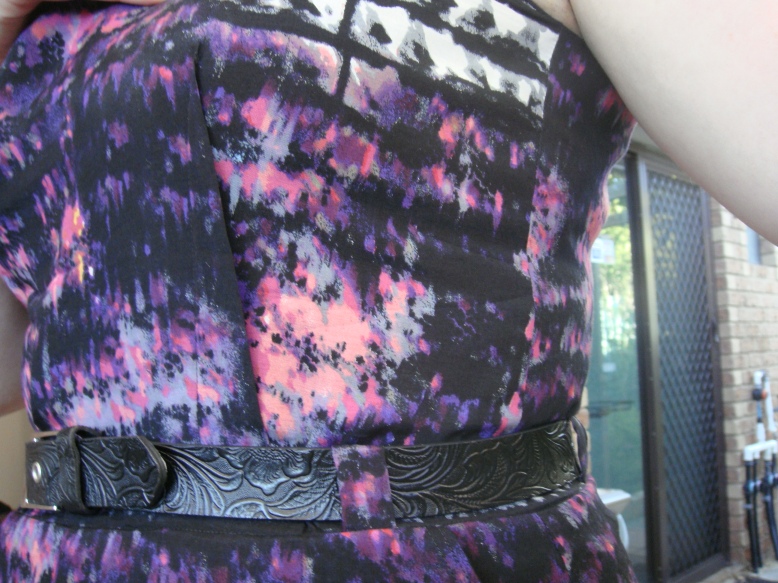
Final thing to say? The dress is fully lined using the lovely black silk-cotton (also purchased on sale from Potters). Lovely, lovely. 🙂

Btw – are you friends with Potter Textiles on Facebook? If not, send them a friend request here:: http://www.facebook.com/fabricoutletshop

A summer Gabby

sarahs_avatarMy second sewing project of the Christmas break was my (second) Gabby top!

“Gabby” is a AU$6 downloadable, print-at-home pattern from Tessuti. The pattern is technically a dress, but I opted to shorten it into a top. Gabby is a really simple pattern – it’s made up of a front piece, back piece, sleeves… no zippers/buttons, no darts! As a result it’s a quick and easy sew!

I made the pattern up out of a light weight cotton lawn from Spotlight. (As an aside, I love that Spotlight are now stocking a lot more pretty cotton fashion fabrics… though truth be told, the vast majority of the lawns are in colours/patterns which are no good for me. But, when I spotted these green polka dots, I knew this was a pattern I would wear!)

So, here’s the top I made (sorry, apparently I only take photos of garments after I’ve been wearing them all day ;-)). It’s perfect for summer – cotton, light and breezy.

DSC04121


This is the top from the back…

DSC04122The neckline of the top is finished with bias binding. Now, just between you and me… I didn’t originally intend for the binding to be a contrast/feature – I accidently just sewed it on backwards, and couldn’t be bothered unpicking it! But, sometimes you get lucky, and you end up LOVING the mistake you made! 😀 Oh, and somehow I managed to get the bias binding to sit perfectly flat. Not sure what I did to achieve this, but you take it when it happens, right?!

DSC04127So far I’ve made 2 of these tops, and I have plans for one more – 2012 was a good year for finding patterns worth repeating! HUZZAH! 🙂


Ridiculous(ly comfortable) trousers

sarahs_avatarSo, I had an idea for a pair of trousers… the idea wouldn’t go away, so I decided to just make it happen! I am now the owner of a pair of super comfortable extremely wide-legged blue linen trousers. 🙂

The pattern for these trousers was built from Burda 7654 – a pair of culottes (not that you’d probably know to look at them)! Oh, and no, I don’t remember what the Kwik Sew ref written on the pattern was in regards to. :-S

Culotte pattern

I removed the ugly pleats from the front, shifted the zipper to the side seam (removing the fly front), added back pockets, and lined the upper part of the trousers .

Please excuse all the creases in the photos, and remember that a) these trousers are 100% linen (crease-inevitability) and b) I’ve been wearing them all afternoon…

Nb. My photos have inserted out of order, but I can’t be bothered to change them around… so we’re starting with the back view!
DSC04099

The front view. IMHO, the volume of these trousers mean that I need a fitted top to wear with them – I bought this one (for cheap) specially for the purpose!
DSC04104

I added back pockets, with some detail… just because.

DSC04112

As you can see from this final photo, I lined just the arse-area with some silk cotton (also from Potters). I wasn’t 100% convinced that the linen wasn’t see-through, so I added a lining to the top just to be sure! I used the selvedge for the bottom of the lining (rather than a hem) to avoid any lines/bulk. This worked well. Blue linen trousers (inside)

So, there you have it. Blue linen SUPER wide-legged, summer-friendly trousers… just because. Consider that itch scratched. 😉

[This was my first sewing project of my Christmas break. Two more to come!]